Zoom is one of the most popular and powerful online communication solutions in the world right now. HubSpot is a leading business management platform focused on putting customers back at the center of how companies operate. Put them together, and you get Zoom for HubSpot, an extension that gives you shortcuts for inviting clients to meetings and webinars, as well as turning webinar attendees into new clients and tracking their engagement with your seminars.
These are some of the nifty things the HubSpot-Zoom integration can do. We’ll expand a bit on a few of them, but we’ll mainly be covering one of the most amazing features it has: the ability to use workflows to invite your HubSpot contacts en masse to Zoom webinars!
What is covered in this article
First, we’ll take a closer look at some of the more minor benefits of the add-on.
Benefits of integrating Zoom with HubSpot
As we mentioned, the most powerful feature of Zoom’s HubSpot integration is that it allows you to bulk-invite your HubSpot contacts to Zoom webinars. But there are a bunch of other cool things you can do with the Zoom Hubspot integration, such as:
- Automatically create a Zoom meeting when a potential client books an appointment
- View Zoom webinar attendance details for your contacts
- Sort and filter your contacts based on their Zoom webinar attendance
- Keep Zoom webinar attendees from your own company from becoming new contacts
For more information on the integration’s other benefits, see HubSpot’s guide to use the integration.
Requirements for integrating HubSpot with Zoom
To get the most out of the HubSpot and Zoom integration, you have to have a number of things set up on both your Zoom account and your HubSpot account:
- Your HubSpot account must have a Professional or Enterprise-tier subscription to the Marketing Hub tool.
- You must have a subscription to Zoom Video Webinars. (Any participant limit is fine.)
- Your Zoom account must be licensed as a host for webinars, and you must have certain administrator permissions on it. (See more below.)
- You must have Super Admin permissions in your HubSpot account.
- You can only connect one Zoom account to your HubSpot account, but multiple users from the same Zoom account can use the integration once it’s set up.
PRO TIP
If you own multiple HubSpot accounts, it is not advisable to integrate the same Zoom account with more than one of them. This may put your private or sensitive information at risk.
In addition, the Zoom integration for HubSpot requires these permissions for your HubSpot account on Zoom:
- View your account information
- View and manage meetings for all account users
- View all user recordings
- View report data
- View all user information
- View all user webinars
- View and manage all user webinars
You must also have the corresponding administrator permissions on your Zoom account to be able to grant these permissions and install the extension.
How to integrate HubSpot with Zoom
Zoom for HubSpot is now an officially-sanctioned add-on in the Zoom App Marketplace, along with over 100 other useful extensions that we cover briefly in our Zoom integrations master list. The upshot is that it’s much simpler to set up than it used to be. You will still have to visit your HubSpot account to install and manage it, though.
Here’s how to set up the Zoom and HubSpot integration:
- Open a new tab or window in your web browser, go to Zoom’s home page, and log into your account.
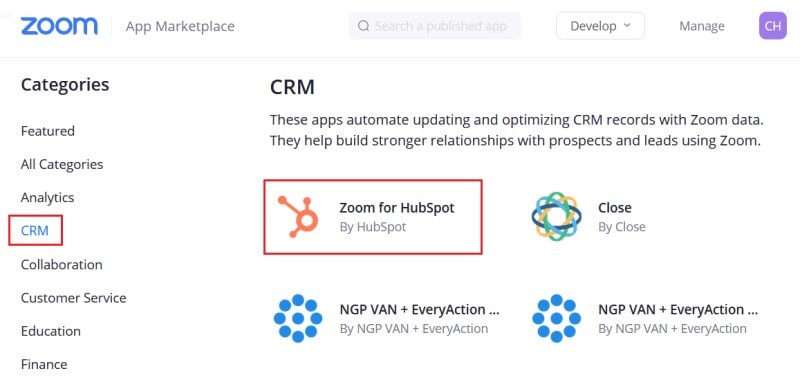
- Move your cursor over Solutions in the menu near the top, and then select App Marketplace from the drop-down menu that appears.

- Once you’re in the Zoom App Marketplace, under the “Categories” menu on the left, click CRM. You should see Zoom for HubSpot near the top; click that.
IMPORTANT
Don’t click HubSpot Notifications; this is a different app.
- Depending on your account settings, you may need to pre-approve Zoom for HubSpot’s installation. Click the toggle button marked “Pre-Approve.” You should see the Install button change to Visit Site to Install; click that to go to HubSpot and finish the rest of the process.

PRO TIP
Make sure in the Who Can Install menu that the toggle button for “Allow All Users on the Account with the Required Permissions to Install This App” is enabled. If it isn’t (like in the screenshot below), you will have to manually add yourself (and other users or groups on your Zoom account) to a list of people who are allowed to install Zoom for HubSpot.

- Click the button under the extension’s basic info. If you are already signed into your HubSpot account, it will read Connect to Zoom. If not, it will read Sign In to Connect App, like it does in the screenshot below. In the latter case, sign into your HubSpot account when prompted.

- You may be asked to provide your Zoom log-in credentials; if you are, do so. However, you may be able to skip this step because you are already logged into Zoom.
- You will be asked to provide Zoom for HubSpot permissions for your Zoom account. Click Allow.
- You will be returned to HubSpot. If you go to Settings > Integrations > Connected Apps, you will see Zoom appear. Click that to review the permissions the add-on has for your account, create rules preventing HubSpot from adding new contacts based on Zoom webinar attendance (if they’re already in your system), disconnect the integration, and more.

(Image credit: HubSpot Knowledge Base)
Configuring and using the HubSpot integration with Zoom
If you successfully manage to integrate Zoom with HubSpot, then it’s time to put it to work! You’ll first need to create a webinar in Zoom with some specific parameters, and then you can set up a workflow to automatically register contacts that meet the workflow criteria as attendees at your Zoom webinar. We’ll go through it step-by-step below.
Part 1: Schedule a webinar
- Go to Zoom, log into your account, and click Webinars under the “Personal” menu on your main dashboard.

Then click Schedule a Webinar to create a new webinar, or click on an already-scheduled webinar to view and edit its details.

(Image credit: Zoom Help Center) - Set up or edit the webinar’s details as you normally would. Make sure the checkbox labeled “Registration” is marked. Then click Schedule or Save.
- Once your webinar is scheduled or edited, and you are viewing its details screen, scroll down and click the Invite Attendees tab (if it isn’t already selected). Then, beside “Approval”, click Edit.
- Click the Registration tab (if it isn’t already selected), and then click the radio button beside “Automatically Approve”.

(Image credit: Zoom Help Center) - Next, click the Questions tab and make sure that no other fields besides “Last Name” are marked as “Required”. If they are, click the checkbox under “Required” next to the marked fields to unmark them. Then click Save All to save your changes.

(Image credit: Zoom Help Center)PRO TIP
You don’t necessarily have to mark “Last Name” as a “Required” field; you just have to make sure all other fields aren’t marked like that. Also, “First Name” and “Email Address” are “Required” fields by default, so don’t worry about those.
- If you want to be able to auto-send custom confirmation emails to webinar attendees from HubSpot (which we cover in part 3), you can follow this step and the next. If you want to send out emails through Zoom instead, you can skip to step 8.
First, scroll to the bottom of the main webinar information window and click the Email Settings tab. Then, next to “Confirmation Email to Registrants,” click Edit.
- In the box that pops up, click the checkbox labeled “Send Confirmation Email to Registrants” to unmark it, and then click Save.
- Once you’ve configured everything for your webinar, copy down the webinar’s ID code. You will need it for the next part, where you’ll use Zoom’s integration with HubSpot to create a custom workflow action.

(Image credit: Zoom Help Center)
Part 2: Create a workflow
- Go to HubSpot, log into your account, and create a new workflow (or start editing an existing workflow).
- Click the “+” icon to add an action to be taken based on the workflow’s conditions.

(Image credit: HubSpot Knowledge Base) - Under the “Integrations” heading, click Add Contact to Zoom Webinar.

(Image credit: HubSpot Knowledge Base) - Enter the webinar ID code you copied down earlier into the space prompted, and then click Save.
If you completed steps 6 and 7 in part 1, you can now start setting up custom confirmation emails to send out to webinar invitees, as well as use them to check whether or not your workflow is functioning correctly. We’ll go over how to do those things in parts 3 and 4.
If you’re sending these emails out through Zoom instead, skip to part 5.
Part 3: Set up custom confirmation emails
- Go back to your main dashboard in HubSpot and start creating a new email (or editing an existing one).
- While editing the main body of your email, place your text cursor where you want the Zoom webinar link to go. Then click the Personalize drop-down menu.

(Image credit: HubSpot Knowledge Base)From here, click Token, and then Contact, and then Last Registered Zoom Webinar.
- Click in the field marked “Default Value” and set a value to use if the contact’s info doesn’t return your chosen token (which, hopefully, it always will). You can also click the checkbox here to use the global default value here. Then click Insert.

(Image credit: HubSpot Knowledge Base) - Your token isn’t an actual link yet, so you have to change the coding to make it that way. Start by clicking the Advanced menu in the upper-right corner of the editor, and then click Source Code.

(Image credit: HubSpot Knowledge Base) - Where you inserted the token, you should see code that looks similar to this:
{{contact.last_registered_zoom_webinar}}
You need to change it so that it looks like this:
<a href=“{{contact.last_registered_zoom_webinar}}”> {{contact.last_registered_zoom_webinar}} </a>
- Once you’re done editing the code, save your email and go back to the workflow you were editing. Add sending an email as a new action, select the email that includes the token link to the Zoom webinar, and click Save.
IMPORTANT
These emails will only be sent to the first 100 registrants for a webinar.
Part 4: Test your workflow
- Once you are done putting together your workflow, click Test in the upper-right corner of the workflow editor.

(Image credit: HubSpot Knowledge Base)
- In the panel that appears, click the Preview For drop-down menu and choose a contact. Make sure the checkbox labeled “Send Me the Emails This Workflow Would Deliver” is marked. Then click Test.
- The test emails will be sent to your email account, not that of the contact you select. So check your email account to make sure the email with the Zoom webinar link comes in. If it doesn’t, or the link doesn’t work, review your work in parts 2 and 3.
IMPORTANT
If advanced GDPR functionality is enabled for your HubSpot account, or you have unsubscribed from your own account’s marketing emails, you may not receive the test email. You will be notified of this as an error in the test results. You will need to opt into, or resubscribe to, these emails in order to get the automated test email.
Part 5: Enable your workflow
- When you’re ready to deploy your workflow, click the Review button in the upper-right corner of the editor.

- If you’re satisfied with how everything looks, click Turn On. You will be asked to confirm your choice; click Yes, Turn On and you’re ready to go!
That wraps up our explanation of how to integrate Zoom with HubSpot, and how to set up and use its best function. We do hope, though, that you check out some of its other features to get the most from the integration. And don’t forget that Zoom also has integrations with a bunch of other handy productivity tools. We have guides that show you how to use a few of them, such as Zoom’s Google Calendar add-on and Zoom’s Calendly extension.